Sunday, September 9, 2018

Farm Irrigation


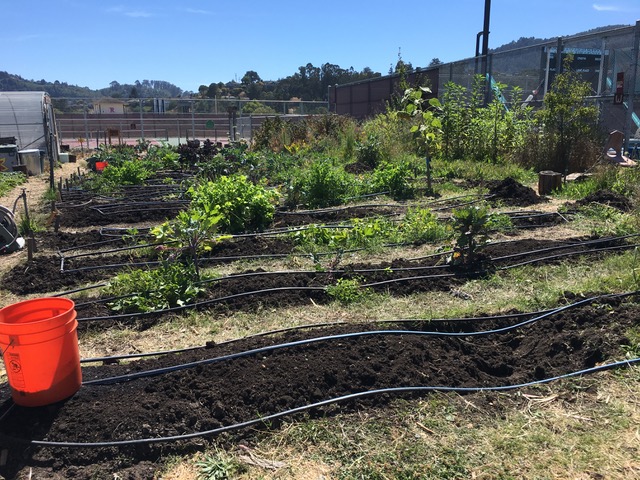
Fun facts about drip irrigation is that it takes water straight to the crop providing necessary crop needs for the crop to bloom. Drip irrigation is one of the most efficient ways to provide crops need and supply unlimited amounts of nutrients and vital needs for the crop. Drip irrigation system saves time and money. Sprinkler systems are less efficient than a drip system because sprinkler systems tend to fail to provide water at giving times. Drip system is a type of watering system that has the potential to save water and nutrients by allowing water to drip slowly to the roots of the plants. We as a class use drip irrigation systems because of the facts listed above.     
An irrigation system is process in which water can be supplied through pipes, ditches, and sprinklers. Main objective of an irrigation system is to help agriculture crops grow. The main importance of a irrigation system is to keep crops moisturized necessary for the germination of seeds. Plants can absorb nutrients and minerals from the irrigated soil. Because of an irrigation system its possible to supply the amount of hydrogen and oxygen necessary.
Possible set up: First step is to connect a water supply with 3/4 inch PVC pipe. Install a shut off valve in the PVC pipe so water supply could can be turned off. Second step is to install a T-fitting every 6 inches in the PVC pipe that will be used. 3rd step is attaching a 24-volt sprinkler wire to the solenoid on each valve. 4th use a 1/4inch spaghetti tubing to deliver water to the plants. 5th Manually open the valves one by one to flush water through the tubing to remove any dirt inside the tubes. Last step is to close off the end of each line by placing a end cap of the end of each tubing.

-Yahya


Growing Soil


As farm work begins for the school year. Many students have finished double digging their beds to make sure that they are properly aerated to sustain crops and are now focusing on what they will plant to make their OneBed project unique to their group. Among a wide variety of options are: broccoli, beans, kale, lettuce, radishes, and sunflowers. But almost equally important to the care of the seeds and growth of the crops is the soil. In Sustainable Agriculture we're not just growing plants but also soil. A good thing to remember when trying to grow your own plants is that the soil is the key to the harvest. Without fertile soil the plants will not get the proper nutrients that they need to prosper.  Soil provides the support for plants and most of the nutrients. As the soil components break down, elements are released and become available to plants as nutrients. Because the farm is on filled in marshland, we are constantly battling with poor soil. To make up for the soil quality we must add fertilizer and compost to replenish the nutrients and insure for great crop yields. As we continue throughout the year we will constantly monitor the soil to make sure everything is correct and our crops are getting the proper nutrients that they need. 
-Mats


Tuesday, September 4, 2018

Double Digging Starts the Year off Right on the Sustainable Agriculture Farm


Over the summer, our farm expanded up onto the hill to give students easy access to our orchard and vineyard. These trees and vines will hopefully allow for a new type of crop for sale at farm days.
We now have 3 classes of Sustainable Agriculture, allowing for more beds to be closely monitored by students on the farm. Instead of only the A beds being used for students' one bed assignments, we have also moved to using the B beds, which have been tarped the entire summer to reduce weeds, although it has also dried out the beds leaving a lot of room for compost and soil improvement.

This week, students were assigned beds on the farm and given the task of double digging, which removes weeds, aerates the soil, and adds back nutrients and raises the beds to prepare for another year of growing crops. They also added compost and phyta-grow, an organic fertilizer, to help replenish the soil's nutrients.
As a second year student and Lab Tech, I have been working on preparing a D bed for heavy yields for our market days, as well as helping students in class with any questions about the farm. We have also added tarps to some C beds so they will be ready to plant in for our winter season and cleaned out the seedlings in the hoop house so we can bring in new seedlings for planting next week or the week after.

Micaela Wilcox

This Week

This past week in sustainable agriculture we have been getting our beds ready for planting.  The first step in this process is double digging, which aerates the soil and helps us grow our crops.  To begin the process of double digging we remove a section of the dirt on the end of the bed and move it to the other end.  We then aerate the space where we took the dirt out using either a spading fork or a u-bar. This creates more air pockets which allows more water to be absorbed by the soil and the roots can grow easier through the soil.  We then take the dirt that is next to the trench we dug out and turn it over into the trench adding compost and fertilizer as we go. This creates a new trench where we then repeat the process of aerating the soil, adding compost and fertilizer, and then moving onto the next section of our beds.  Once this process is done for the entire bed. We will be able to grow crops with the best chances of growing successfully and yielding the most amount of food. The image below is of the process of double digging.


Double Digging


The past week or so, in Redwood High Schools Sustainable Agriculture class, has been all about preparing our planting beds for this year. So far, the main part of this process has been double digging the soil in the beds. Double digging is a gardening technique that's purpose is to boost aeration in the planting soil. By increasing aeration, you are allowing water to drain better and roots to penetrate easier through the soil, allowing the plants to grow with ease.
Double digging starts of by weeding a small section of the bed. It's especially important to try and get rid of all the invasive plants, such as bermuda grass. Once the area is free of weeds, it's time to start digging. Using a spade shovel, dig up the topsoil(about 8-10 inches) to create a trench about as wide as the head of the shovel. Set aside the soil from the first dig at the other end of the planting bed. Then add a good amount of compost or fertilizer to the trench and use a spading fork to aerate the subsoil and compost. Then repeat this process again in the soil next to the first trench, but instead of putting the topsoil at the other end of the bed, move it onto the previous trench. By putting on the new soil and by adding a good amount of fertilizer, the first section that was double dug should now be raised about six inches above the ground level. Image result for double digging
This process continues until you reach the last trench at the end of the bed. Once you reach the end, and the subsoil has been fertilized and aerated, add the soil from the first trench that was set aside. The double digging is complete! Now all that's left is to sprinkle soil amendment over the bed and water it in. Soil amendments are materials that can be added to soil to enhance it's physical or chemical properties.
Though it can be a laborious process, double digging will deliver long term benefits to your garden.


Thursday, June 7, 2018

MPMS Presentation


Last Friday, Gabe Mando (4th period) and I went to Marin Primary and Middle School --MPS-- to present about sustainability and our sustainable agriculture class. Our presentation was pitched to a class of about 20 6th grade students. We tried our best to incorporate the most important topics we learned this year into our presentation. These include soil testing, double digging, watering and planting methods. We also explained how we work in our class to be sustainable and use BIOSORN as a guideline. In an attempt to engage the kids that we were presenting to, we brought soil from the farm and from Heatherwood Park and let the kids do soil testing to determine the composition of the soil. Our farm soil was very close to Loam on average and the other soil was much more sandy (not as healthy). The kids had fun getting their hands dirty and learning about how they can use different feel tests to determine the sand, silt, and clay compositions in the soil that they were holding. An objective of our presentation was to educate the students on SustAg as a class and encourage them to one day take it when they go to Redwood High. We explained projects we do and trips we take such as the one bed project, market days, and our field trips this year. Overall, our presentation was very successful and we received a lot of good questions and feedback.

Tuesday, June 5, 2018

2018 Final Projects

See many examples of our Final Project work from this spring (2018) here:
https://www.facebook.com/pg/redwoodsustag/photos/?tab=album&album_id=2154408008114767

Thank you for all of your hard work and your positive contributions!

Sincerely,

Mr. Stewart